Saturday, May 16, 2015

Special Salmon Steak

Gary and I went to do the grocery last Thursday and decided that since the sun has started to shine, it would be a good chance for us to buy some salmon steaks to make on the BBQ. So we bought some fresh salmon and got right to checking for new recipes. Unfortunately, when today came along, we realized we didn't have the time to marinate the salmon steaks so we made a last minute recipe change and so today we will be preparing Special Salmon Steaks!

Gary started prepping the ingredients on the counter. We needed the fish, some melted butter (although we used margarine), lemon juice (which we thankfully bought more of since we recently noticed our bottle was expired!), green onions, fresh minced parsley, garlic salt, and a mix of our own choice of spices, as opposed to those recommended in the original recipe. Gary is especially excited to cook all sorts of new recipes this week since we now have a parsley plant in our sunroom! Let's just hope Gary doesn't eat most of it before we get to making all our meals!

First things first, we mixed up those ingredients (minus the fish, of course) and sprinkled them on the fish, which we had placed in a baking pan. VoilĂ :


Wow, that both looks and smells so good right now! Time to pop these guys into the oven for a quick baking session. In the meantime, Gary suggested we have baked sweet potatoes on the side, and I immediately agreed.

When everything was ready, the house was smelling divine! Now it's time to serve it up and see how it all tastes...


Special Salmon Steak
Prep time: 5 minutes / Cook time: 20 minutes
Makes: 2 servings, 1 portion each

Ingredients: 
  • 2 salmon steaks
  • 2 tbsp butter, melted
  • 2 tbsp lemon juice
  • 1 green onion, sliced
  • 1 tbsp fresh parsley, minced
  • 1/4 tsp garlic salt
  • 1/4 tsp salad herb blend* (or more, if desired)
  • Pepper, to taste
Directions: 
  1. Place salmon in lightly greased 8 inch square baking dish. Top with butter and lemon juice.
  2. Combine onion, parsley, salt and herb blend; sprinkle over salmon. 
  3. Bake, uncovered for 15-20 minutes, or until fish flakes easily with fork. 

Rating: 10/10! 

Wowza! This tasted incredible! We cannot wait to make this again, hopefully this time with boneless salmon - it was a little harder to eat given that it was fresh unboned salmon this time. But even that could not tarnish how amazing we found this meal. Definitely in our top 5 recipes as a pescetarian meal! 

Saturday, March 28, 2015

Pasta Primavera with Creamy Cauliflower Sauce

Gary got the chance to go on an adventure not too long ago by accompanying me on a trip to Halifax to visit my momma bear. While there, we decided it would be a good opportunity to try out a new recipe, given that a new house means new ingredients. And who doesn't love coming home to a home cooked meal at the end of the day?

It was a bit hard to find a vegetarian recipe with the ingredients that we had, mostly because they were quite different than the ones we keep on hand at home. But we stumbled upon this recipe for Pasta Primavera with Cream Cauliflower Sauce and actually had all the ingredients! That is, except fresh basil leaves, which we never have on hand at home either. Anyway, let's see how this goes...

We started by cutting up all our veggies and took our grand ole time. We put all the veggies in a large skillet and starting warming that up, and in the meantime, we started boiling our cauliflower in a large pot.

Mmm, smells delicious! 

 Did I mention my mom's pots and pans are actually quite nice compared to ours? We have definitely got to start buying grown-up things now that we're living in the adult world!

Gary thinks it's weird that these trees are white. Are they winter trees?

After the cauliflower was completely cooked, we smooshed it with the help of my mother's blender (that one though, did not work as well as our own blender, although our was a hand-me-down from the step-sister). We had to add quite a bit of water to help get the right sauce texture, and even at that, we were a bit disappointed with the results.

But we added the sauce to the veggies, regardless. And here's how it all turned out:


As you can see, it's pretty thick, not quite as saucy as it seems in the originally recipe. And I wouldn't go as far as to describe it by using the word "creamy." But it smelled quite good, so we surprise momma bear when she got home and served it up for the whole family. 


Pasta Primavera with Creamy Cauliflower Sauce
Prep time: 10-15 minutes / Cook time: 20 minutes
Makes 4-6 servings

Ingredients: 

  • 1 box of long noodle pasta (we chose spaghetti)
  • 3 tbsp unsalted butter
  • 2 garlic cloves, finely chopped
  • 1 onion, finely diced
  • 2-4 cups various vegetables (we went with carrots, mushrooms, snow peas, and brocoli)
  • 1 head cauliflower, cut into florets
  • 1/2 cup shredded cheese
  • Pepper, to taste
  • Parmesan cheese, for topping

Directions: 

For the sauce


  • Fill a large pot with water and bring to a boil.
  • Meanwhile, chop the cauliflower into quarters. Chop off the florets and cut the stems into approximately 1" pieces so that the cauliflower cooks uniformly.
  • Place chopped cauliflower into boiling water for 3-6 minutes, until the stems can be easily poked through with a fork.
  • Remove cauliflower from pot, and place in a blender or food processor. Puree the cauliflower until it is smooth, adding water only if necessary.

  • For the veggies
    1. Fill a large pot with water; bring to a boil. Cook noodles al dente according to the directions on the package.
    2. Meanwhile, melt butter in a large skillet. Add chopped garlic and onion and cook on low until garlic is light brown and onions are slightly translucent.
    3. Add vegetables including broccoli stems (if using), except florets, and cook until just barely tender.
    4. Add creamy cauliflower sauce, shredded cheese and stir until cheese melts. Add water from the noodles, ¼ cup at a time, as needed to thin the sauce. Keep sauce on low until the noodles are done.
    5. When the noodles are done, combine them with the sauce along with florets in the skillet. Toss to coat the pasta well. Season with pepper, serve hot with freshly shredded Parmesan cheese.


    So just now, as I was writing up the blog spot, I noticed that the directions said to add water from the noodles to thin the sauce as needed. That probably would have helped get better results. Oops.

    Rating: 7.5/10 

    It tasted quite bland, and the sauce was much too thick. However, I wouldn't go as far as to say it would not be worth trying, especially given the fact that I missed the tip about how to thin out the sauce if it wasn't the correct consistency. I would definitely add some spices though, because it doesn't taste like much other than the veggies themselves and a bit of cheese. 

    Sunday, March 15, 2015

    Pineapple Tofu Stir Fry

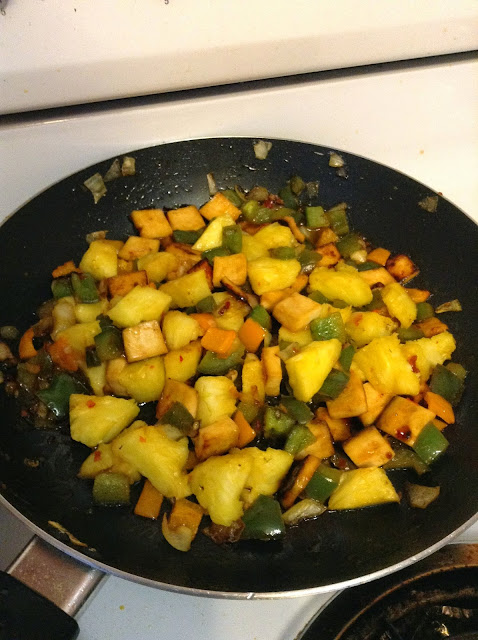
    Gary and I are not the biggest fans of citrus foods but seeing as the man of the house loves it and also loves stir fry, we thought we would give it a try. We present to you: Pineapple Tofu Stir Fry.

    We started off as we always do, by cutting up all our ingredients. Holy pineapple Batman!

    Note to self: A full pineapple is way too much for this recipe. 

    Just so you are all aware, the original recipe calls for a can of pineapple chunks, but we prefer fresh fruits so we went out a bought a whole pineapple for this recipe - and as snacks for many days to come. 

    Oh, and we also decided we would just go ahead and not make the recommended sauce for the recipe. That may actually have impacted the final results in a large way, but I guess we'll have to cook it again at a later date to find out about that. 

    After having prepared everything else for the recipe, we got right down to the cooking.


    Tip: Remember to prepare the tofu in advance. Ours was not crispy enough in the end because I didn't start frying it before the rest of the meal.

    Pineapple Tofu Stir Fry
    Prep time: 10 minutes / Cook time: 35 minutes 
    Makes 2-3 servings

    Ingredients: 
    • 3 tablespoons olive oil
    • 1 package extra-firm tofu, cut into bite-sized pieces
    • 1/2 of a fresh pineapple, cut into 1-inch chunks
    • 1 tbsp cornstarch
    • 1 tbsp minced garlic
    • 2 tsp minced ginger
    • 1 large bell pepper, cut into bite-sized pieces
    • Sweet Red Chili Thai Sauce

    Directions: 
    1. In a large skillet, fry up the tofu in olive oil. Let cook for 10-20 minutes, flipping every so often, until golden brown.
    2. Transfer tofu to bowl. In same pan, add olive oil if needed and start cooking garlic and ginger, stirring constantly, for about 30 seconds. Add bell pepper and cook until just tender, 2-3 minutes.  
    3. Transfer tofu from bowl to pan, and add tofu chunks. Pour sauce over all the ingredients and cook until pineapple is heated through, 2-3 minutes. 


    Rating: Richard - 9/10    Carmen - 7/10

    Richard really liked this recipe and found the taste to be well balanced between sweet and savoury. As for myself, I am not a big fan of tangy flavours in general and found that it was not a good ingredients to be found in stir fries or curries. It reminds me a lot of a Mango Curry recipe, which I was not very fond of as well, for the same reason. I did love the switch of sauce though - can't get enough of our new purchase, a sweet red chili Thai sauce. 

    Tuesday, February 17, 2015

    Lo Mein

    Today, Gary and I decided it was time to try out a Lo Mein recipe, but with our own twist. We had already tried out this recipe back in January and found it quite good, but it seemed to be missing a bit of something so we made these changes and hope they'll turn out well! 

    I think one of the things I like most about Lo Mein is that most recipes don't call for onions. Don't get me wrong, it's not that I don't like onions, but it makes for a nice change not having that taste in every single recipe. 

    So since there aren't any onions, we started warming our garlic and added all the veggies to the pan right away. In the picture below, you'll see our choices of veggies, as well as the tofu that we added after cooking it in a frying pan for 15-20 minutes. 

    You've got your zucchini, your carrots (fave!), your red peppers, your mushrooms and your tofu!

    After cooking it all up, we decided not to make the sauce from the original recipe, which we did like though, and went with a thai sauce that was SO delicious. Basically, we were lazy and didn't want to prepare a sauce from scratch, ok? Don't judge us. 

    So here's the final product laid out in one of our plates. Looks and smells so good!


    Lo Mein
    Prep time: 10 mins / Cook time: 35 mins
    Makes 4 servings

    Ingredients: 
    • 3-4 rounds of Asian Noodles
    • 2 tbsp olive oil
    • 2 garlic cloves, minced
    • 2 cups mushrooms, sliced (approximately)
    • 1 red bell pepper, julienned
    • 1 carrot, julienned
    • 1 zucchini, julienned
    • 1/2 package of tofu, diced
    • Sweet Red Chili Thai Sauce
    Description: 
    1. In a large skillet or wok, heat 1 tbsp olive oil. Add tofu cubes, making sure they do not overlap each other. Let cook for 20 minutes on each side, flipping every so often. Transfer cooked tofu to a bowl. 
    2. In the same skillet or wok, heat remaining olive oil. Add garlic, mushrooms, bell pepper, carrot, and zucchini. Cook, stirring frequently, until tender, about 4-5 minutes. Stir in tofu.
    3. Meanwhile, cook Asian noodles in medium saucepan, according to package instruction.
    4. Stir Asian Noodles into vegetable mixture. Add thai sauce. Serve immediately. 

    Rating: 9/10

    We really love this recipe, be it with the pre-made sweet red chili sauce or with the homemade sauce from the original recipe. Feel free to try it out if you like a good quick & easy thai meal! 

    Original sauce:
    2 tbsp tamari, or soya sauce
    2 tsp sugar (or less)
    1 tsp sesame oil
    1/2 tsp ground ginger
    1/2 tsp Sriracha, or more, to taste


    Monday, February 16, 2015

    Easy Burrito Bowls

    So one day, as Gary and I were sifting through some new recipes online, we thought to ourselves, "Burritos are amazing, why not try a little variety and make some burrito bowls?" And here is where it brought us. We found what looked like a great burrito bowl recipe, put it on the menu, and got straight to work.

    The great thing about a recipe like this is that it's a quick fix meal. We had prepared the rice the previous day to save some time, and also because we thought cold fried rice would be better suited for burrito bowls than fresh warm rice.

    Mmm, look at all those delicious veggies! 

    Easy Burrito Bowls
    Makes 6 servings
    Prep time: 10 minutes / Cook time: 15 minutes

    Ingredients: 
    • 1 cup uncooked rice
    • 1 cup salsa
    • 3 cups chopped romain lettuce
    • 1 15-ounce can kernel corn, drained
    • 1 15-ounce can black beans, drained and rinsed
    • 2 roma tomatoes, diced
    • 1 avocado, halved, seeded, peeled and diced
    Directions: 
    1. In a large saucepan of 1 1 /2 cups water, cook rice according to package instructions; let cool and stir in salsa; set aside. (For us, this was done the previous day - chilled in the fridge overnight).
    2. To assemble the bowls, divide rice mixture into serving bowls; top with lettuce, corn, black beans, tomatoes, and avocado. 
    3. Serve immediately, drizzled with sauce of choice.*
    *Original recipe calls for homemade chipotle sauce. We didn't have all the ingredients so we skipped out for this time. 

    Rating: 7/10

    I think that the lack of sauce probably diminished the rating of this recipe. Although I do love all the individual ingredients called for in the recipe, it didn't make my tastebuds jump from joy. It was fine and I enjoyed the meal as it was, but there is certainly room for improvement. 


    Original recipe found at: http://damndelicious.net/2014/09/10/easy-burrito-bowls/

    Wednesday, February 11, 2015

    Vegan Cream of Brocoli Soup

    One recipe Gary and I have always wanted to try is Cream of Brocoli Soup. I tried it once a few years back and it was not fantastic, so I made sure that the recipe didn't contain the same ingredients so as not to repeat in scenario. Also a bonus, this recipe is vegan-friendly! 

    We got right down to it. We chopped up the veggies and got them cooking. 

    Boiling the veggies in the pot - smells good already!

    After it was all done cooking, it was time to start blending. Side note: this recipe makes a decent amount of soup, as you can see in the photo below, so maybe think about putting half at a time in the blender.


    We served it up in some bowls and we're so excited to see how it tastes!

    Gary thinks it looks like pureed trees. Yum!

    Vegan Cream of Brocoli Soup
    Makes 6 servings
    Total time: 45 minutes

    Ingredients: 
    • 1 tbsp olive oil
    • 1/2 medium onion, chopped
    • 1/2 cup celery, chopped 
    • 1 garlic clove, minced
    • 1 medium yellow potato, peeled and diced
    • 4 cups water
    • 4 cups brocoli florets
    • 1/2 cup almond milk (or soy milk)
    • 1/4 cup nutritional yeast
    • 1/4 teaspoon ground nutmeg
    • Freshly ground black pepper
    Description:
    1. Heat oil in a large saucepan over medium heat. Add onions and cook until light brown, about 5 minutes.
    2. Add celery, garlic, and freshly ground black pepper; cook for 5 minutes.
    3. Add potatoes and water, and raise to high heat until it comes to a boil. Return heat to medium and cook until potatoes are tender, about 15 minutes. 
    4. Add brocoli, cover and let simmer for 5 minutes, or until brocoli is bright green. 
    5. Transfer the soup into a blender (half at a time, depending on the size of blender). Add almond milk and puree until smooth. 
    6. Return the soup to the saucepan and bring to a simmer; stir in nutritional yeast and nutmeg. Add water, if needed, to adjust consistency. 
    Rating: 8.5/10! 

    This meal turned out really great. We all loved the consistency of it, without having to add water or anything, and the taste was just right. Definitely worth trying if you're a fan of some good ol' cream of brocoli soup. :) 

    Friday, February 6, 2015

    Shakshuka

    While travelling, we tried a new middle eastern dish called Shakshuka, and I was a big fan. So Gary and I decided we should give it a try after I stumbled upon a recipe while browsing through Pinterest. Let's see how it all works out...

    First, you have to start cooking all the veggies, and then add the tomatoes before finally cracking the eggs on top of the whole thing. I don't know if the original recipe calls for too many tomatoes, or if you were supposed to drain the can before slapping it on the stove, but generally, I found that there was too much liquid in the pan once all the ingredients had been mixed in. Here's a quick shot of what the meal started to look like after we cooked the veggies and added the eggs:

    As you can see, the pan seems a bit too full, so Gary suggests to try using less tomatoes and/or omitting their juices when cooking this meal up.

    We made sure to keep an eye on things as it continued to cook, but noticed that the eggs seemed to be taking a lot longer to cook that indicated in the original recipe. This may be due to the fact that there were too many veggies, thus making it more difficult for the eggs on top to obtain the heat needed to cook all the way through. But after an extra 10-15 minutes on the stove, things started to take shape and it was looking pretty good! 

    Gary removed the pan from the stove and started making portions for everyone to eat. He made sure to top it all off with feta cheese and some green onions. 

    Yum! Looks so good!

    Unfortunately, the feta cheese may or may not have been passed date, so a certain someone said he couldn't stomach to finish eating it. I, on the other hand, thought it was absolutely delicious! We also had a guest over who said he had enjoyed the meal, although he may have just been trying to be polite. Oh well, maybe we'll get a chance to try this recipe again and change a few things to get a better result. You know, and check all the expiration dates before adding all the ingredients. 

    In any case, we hope you can enjoy making this easy healthy vegetarian meal if it so does please you! 

    Shakshuka

    Makes 4-6 servings*
    Cook time: 20-40 minutes

    Ingredients: 
    • 1 tbsp olive oil
    • 1 onion, diced
    • 1 yellow pepper, diced
    • 3 garlic cloves, minced
    • 1 can chickpeas (or beans of your choice)
    • 1 can of diced tomatoes and their juices
    • 1 tsp cumin
    • 1/2 tbsp paprika
    • 4 eggs*
    • 2 tbsp feta cheese
    • 2 tbsp green onions

    Directions:
    1. Heat olive oil in a large wok or pan, and add onion, pepper, and garlic; cook for 5 minutes, until softened. 
    2. Add tomatoes, chickpeas (or beans of choice), cumin and paprika; cook for 5 minutes. 
    3. Crack the eggs on top of the tomato mixture and cook until the whites of the eggs have set, around 10 minutes. [Side note: it took much longer for our eggs to set so make sure they are well cooked before serving!]
    4. Scatter green onions and feta cheese on top of the eggs and tomatoes; serve with pita breads to dip, if desired.  

    *Note: With the amount of tomato mixture, I feel like it should make 6 servings, so I reheated part of the mixture on the stove and cook 2 more eggs over it. 

    Carmen's rating: 7/10 - Our tomato mixture compared to the one we found in the online recipe was very watery. I would have preferred a thick sauce to go with the eggs. 

    Richard's rating: 5/10 - I think the feta cheese might have been out of date; something tasty really nasty. 

    Wednesday, February 4, 2015

    Quinoa Enchilada Casserole

    Gary is so excited to try out this new recipe: Quinoa Enchilada Casserole! We had been stocking up on quinoa for a while and we definitely need a good recipe to use it up. So let's get to work...

    We got all our ingredients out and set up on the counter and started cooking up the quinoa. Once it was all done, we went on to mixing everything together.

    All the veggies and quinoa mixed together. Looks good! 

    All that's left to do now is to pour it all into a baking pan, top it with some cheese, and pop it in the oven! 


    And here is the finished product: 


    Time to serve it up with a side salad. Can't wait to get munching!


    Quinoa Enchilada Casserole
    Make 6 servings
    Prep time: 10 mins / Cook time: 30 mins

    Ingredients: 
    • 1 cup quinoa
    • 3/4 cup salsa, more if desired (original recipe calls for enchilada sauce)
    • 1/2 cup corn kernels, canned or frozen
    • 1/2 cup black beans
    • 1/2 tsp cumin
    • 1/2 tsp chili powder
    • Freshly ground black pepper, to taste
    • 3/4 cup shredded cheddar cheese (although we went with 1 & 1/2 cup mozzarella instead)
    • 3/4 cup shredded mozzarella cheese
    • 1 roma tomato, diced (optional)
    • 1 avocado, peeled and pitted (optional)
    Directions:

    1. In a large saucepan of 2 cups water, cook quinoa according to package instructions; set aside. 
    2. Preheat oven to 375 degrees F. Lightly oil an 8x8 or 2 quart baking dish or coat with nonstick spray. 
    3. In a large bowl, combine quinoa, salsa, corn, black beans, cumin and chili powder; season with pepper, to taste. Stir in 1/2 cup cheddar cheese and 1/2 cup mozzarella cheese (or half of your shredded mozzarella if only using one kind of cheese).
    4. Spread quinoa mixture into the prepared baking dish. Top with remaining cheese. Place into oven and bake until bubbly and cheeses have melted, about 15 minutes. 
    5. Serve immediately, garnished with avocado and tomato, if desired.

    Rating: 9/10! 

    We really enjoyed this meal, especially given the good combination of spices that didn't feel like too much, nor too little. This is definitely a great meal that is easy to make and delicious to boot!

    Sunday, February 1, 2015

    Eggplant Parmesan

    It was a rushed night, but Gary and I managed to cook up a new recipe we found on Pinterest for Eggplant Parmesan! Because of the rush though, we didn't really have much time for pictures, not to mention that we had to ask the man of the house to finish up.

    So here's how it all went down. We started by mincing the garlic and heating it up, adding the diced tomatoes (didn't use enough, I think) and fresh basil - Yes, we bought fresh basil this week! While it was cooking, we sliced the eggplant and - oh crap, we're out of eggs!! At this point, everything was already on the go and we couldn't very well just leave the house (home alone this afternoon) so we texted Mr. Man and asked if he could pick up a dozen eggs on his way home. To kill some time after everything was ready, except the eggs, I asked Gary to help me shovel in the backyard to get the car out of the snow from Saturday's storm, but he wasn't too excited by the idea. I went outside by myself and came back in to continue our cooking adventure once the man got home with the eggs.

    Now that we had all the ingredients, we started dipping the eggplant slices into flour, eggs, and breadcrumbs/cheese mixture. These need to be baked by themselves first, so we threw them in and put the timer on. But at this point, I was running out of time so I passed on the cooking responsibility to my main man. Gary tried to be patient with him, and I think it all turned out quite well! Here is the final result:

    "This vegetarien thing ain't so bad when your girlfriend is an amazing cook" - Richard's words, not mine!

    Eggplant Parmesan
    Makes 4-6 servings
    Total time: Approximately 1 hour

    Ingredients:

    • 1 large eggplant, sliced
    • 1 tbsp olive oil
    • 1 garlic clove, minced
    • 1/2 28-ounce can diced tomatoes with their juices (or more, depending how much sauce you would like)
    • 1/4 cup fresh basil, chopped (or less, depending how much sauce you end up with - eyeball it)
    • Freshly ground black pepper
    • 3/4 cup breadcrumbs - we used cornflake crumbs instead, tasted great!
    • 1/8 cup Parmesan cheese + 1/2 cup more for toppings 
    • 1/4 cup flour, or more if needed
    • 2 eggs, beaten, or more if needed
    • Olive oil or non-stick spray for bottom of pan

    Directions:

    1. Slice eggplant 1/4 inch to 1/2 inch thick rounds. 
    2. Heat the olive oil on medium heat. Add the minced garlic and gently cook for 1 minute, or until fragrant. Add the tomatoes and their juices. Increase heat to bring to a simmer, then lower heat to maintain a very low simmer for 15 minutes, uncovered. Add pepper to taste. Add the basil and remove from heat. 
    3. Combine the breadcrumbs with 1/8 cup of Parmesan cheese and place in a shallow bowl or rimmed dish. Set up your station so that you have flour in one shallow bowl, beaten eggs in another, and breadcrumbs/Parmesan mixture in the third, in that order. 
    4. Preheat the oven to 425°F. Spread olive oil or non stick spray onto two baking sheets. Working one at a time, dredge the eggplant slices first in flour, then in eggs, and lastly in breadcrumb and cheese mixture. Place on oiled pan. Drizzle a little oil over each breaded eggplant slice.
    5. Place both baking sheets in oven and cook for 18 to 20 minutes. Turn over slices half-way through (if you don't forget), and remove from oven once browned. 
    6. Spread a small amount of the tomato-basil sauce onto the bottom of a casserole dish. Place half of the eggplant rounds in the dish in a single layer, covering the sauce in the bottom of the pan. Layer half of the mozzarella cheese and Parmesan cheese onto these slices, followed by half of the remaining tomato-basil sauce. Cover these with the second half of the eggplant slices, and cover again with remaining cheese and sauce. 
    7. Bake uncovered for 25-30 minutes. Remove from oven and let sit for 10 minutes before serving. 


    Original recipe found at: Simply Recipes


    Tuesday, January 27, 2015

    Homemade Fresh Peach Cobbler

    Oh man, is there anything better than homemade fresh peach cobbler? My mouth is watering at the thought of making some again!

    Gary was excited too, seeing as he hasn't done a lot of baking since we started our adventures in the kitchen. He got this peach cobbler recipe from our friend Sarah and it was quite delicious, so let's hope we get the same results!

    We started off by peeling the peaches and them cutting them up into slices to remove the core. With a new kitten in the house, this proved to be a bit more difficult than we had anticipated...

    Kovu's favorite napping spot: my shoulder. 

    After many distractions, we eventually succeeded to peeled and slice 4 peaches. At this point, we gave up and decided to make a half recipe and see how it would turn out. We were only going to be three people for supper anyway, because one person had to cancel, so I'm sure it'll be enough for everyone. And this way, we'll still have peaches leftover if we want to make a second batch later in the week! 

    Note: I guess peaches don't keep very well on the counter, but we managed to make the second batch the following day when one of the peaches started going bad

    Here you can see the peach cobbler, all garnished and ready to be baked!

     Yum! Gotta love that brown sugar & cinnamon mixture on top!

    I had planned on taking a before and after shot, but it looked and smelled so good that I accidentally served some before remembering to take a picture! Oops. 

    The peach cobbler after being baked in the oven, with a few bites missing. ;) 

    Wowza, this tasted amazing!

    We hope you can enjoy making this fantastic desert and that it turns out just as great as ours did, despite cutting the recipe in half. 

    Fresh Peach Cobbler

    Prep time: 20 minutes / Cook time: 40 minutes
    Total time: 1 hour
    Makes 6 servings

    Ingredients: 
    • 8 fresh peaches, peeled, pitted and sliced into thin wedges
    • 1/4 cup white sugar
    • 1/4 cup brown sugar
    • 1/4 tsp ground cinnamon
    • 1/8 tsp ground nutmeg
    • 1 tsp lemon juice
    • 2 tsp cornstarch
    • 1 cup all-purpose flour
    • 1/4 cup white sugar (yes, again)
    • 1/4 cup brown sugar (also, again)
    • 1 tsp baking powder
    • 6 tbsp butter, cut into small pieces
    • 1/4 cup boiling water (or more)
    Plus: mix together 3 tablespoons white sugar with 1 teaspoon ground cinnamon on the side. 

    Directions: 
    1. Preheat oven to 425°F.
    2. In a large bowl, combine peaches, 1/4 cup white sugar, 1/4 cup brown sugar, 1/4 tsp cinnamon, nutmeg, lemon juice, and cornstarch. Toss to coat evenly, and pour into a 2-quart baking dish. Bake in preheated oven for 10 minutes. 
    3. Meanwhile, in a large bowl, combine flour, remaining white sugar and brown sugar, and baking powder. Blend in butter with your fingers tips, or a pastry blender, until mixture resembles coarse meal. Stir in water until just combined. 
    4. Remove peaches from oven, and drop spoonfuls of topping over them. Sprinkle entire cobbler with sugar and cinnamon mixture. Bake until top is golden, about 30 minutes. 


    Loaded Vegetable Soup - Loaded is right!!


    Let me just start out by saying that the original recipe makes WAY too much soup. Gary and I usually make half recipes anyway, and a half recipe of this couldn't even fit in our biggest pot! We probably should have checked the ingredients before starting...

    We got to work right away and cut up ALL our veggies - even celery. We did omit the potatoes and extra tomatoes though, due to lack of space after we had started putting everything in the pot. We also never buy fresh herbs so Gary decided to wing it with dried spices. It didn't help that the serving sizes were all messed up so we'll definitely try to get the taste right next time.

    Big pot of Loaded Vegetable Soup!

    One serving out of ten; that's a lot of soup!

    Here is our version of the recipe, followed by the link to the original recipe: 

    Loaded Vegetable Soup

    Ingredients: 
    • 3 tbsp olive oil
    • 2 large carrots, peeled and sliced
    • 3 sticks celery, chopped
    • 1 onion, chopped
    • 2 garlic cloves, minced
    • 1 green pepper, chopped
    • 1 red pepper, chopped
    • 1/2 head of broccoli, cut into small chunks
    • 1/2 cup mushrooms, sliced
    • 1 15-ounce can diced tomatoes, with juices
    • 1 15-ounces can corn, drained
    • 1 potato, scrubbed and diced with skin on (omitted from this recipe due to lack of space)
    • 4 cups water
    • 2 tbsp tomato paste
    • 3 tbsp dried basil
    • 1/2 tsp freshly ground black pepper
    • 1/4 tsp red pepper flakes
    Directions:
    1. In a large saucepan, drizzle olive oil and warm on medium heat.
    2. Start with the carrots and saute your vegetables.
    3. I chop as I go, adding in one vegetable at a time until they are all sauteed while stirring.
    4. After all the vegetables are added, slowly add the water, tomato paste, basil, black pepper and red pepper flakes. 
    5. Stir, cover and turn heat to low-medium.
    6. Let simmer on your stove top for 45 minutes to 1 hour.
    7. Turn off the heat.
    8. Serve hot with fresh Mile High Biscuits!
    Note: This recipe is definitely missing a little something. Maybe some vegetable broth or some added thyme and oregano. We'll update next time we try out this recipe. If you have any suggestions, please feel free to leave us a comment!

    Original recipe found at: http://www.cozycountryliving.com/loaded-vegetable-soup/

    Saturday, January 17, 2015

    Three Sister Empadas

    I think it's about time we get back on track with posting some new recipes, don't you? Here's what Gary and I decided to cook up last night: Three Sister Empadas. We found this recipe on Pinterest a little while back and decided to give it a go.

    First set back of the night was that we ran out of eggs yesterday and forgot that we needed to go get some more. Fortunately, it was good timing because eggs are on sale today at Shopper's Drug Mart for $1.99! And as a side note, you can get $0.25 back this week if you upload your receipt on the Zweet App!

    After we returned from the store, Gary and I got to cooking. We started out by making the dough, which requires whole-wheat flour and all-purpose flour, although these could easily be replaced with gluten-free flour if you can't do regular flour. We mixed the ingredients - omitting the salt as we usually do - and finished with a nice looking ball of dough. We wrapped that up in some plastic wrap and set it in the fridge for an hour or so to cool. While waiting for the dough to be ready, we put the veggies in the oven and then it was time to wait. Gary thought it would be fun to pass the time by playing with our new kitten, Kovu. I think they're going to be best friends.

    Kovu and Gary hanging out in the living room.

    Then it was time to get the filling ready. We took the veggies out of the oven and mixed them up with the beans, green onions, cheese, and all the spices. Gary doesn't like chilies so we opted not to use those, and I reaaaally dislike cilantro so we are definitely not using that. 

    Mixed veggies with cheese and spices for the empada filling.

    Now the dough is ready to be pressed and divided to make the empadas. We only did a half recipe so we divided the dough into 5 parts and smooshed them before placing filling in the middle and folding them up. Note: Flatten them pretty well, there's quite a lot of filling for the amount of dough. 


    And we can't forget to use the egg wash to make sure everything is sealed up. Here's what they looked like, all ready to go into the oven.

    Three "Three Sister Empadas"

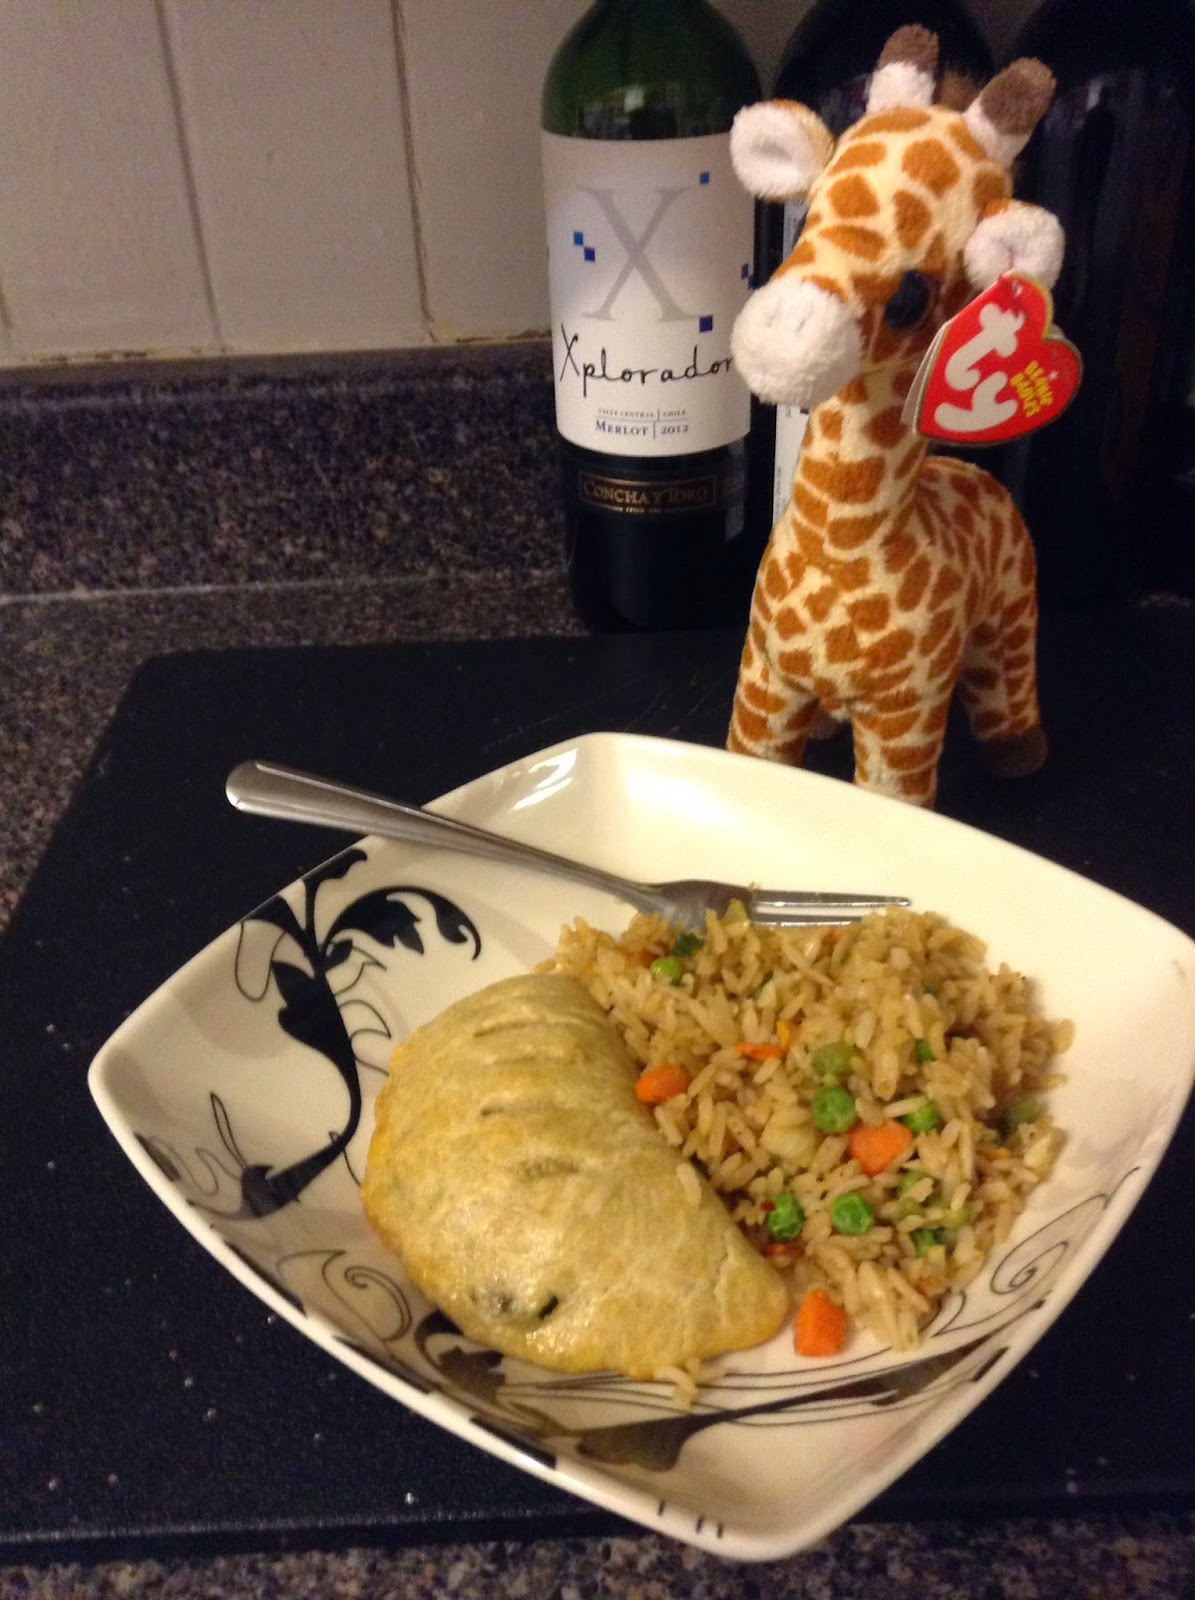
    After some more waiting around - and some wine - we took the empadas out of the oven. They smell so good! And lucky us, we have some leftover rice from yesterday's supper at Tanya & Matt's. Wonderful combo! 


    Three Sister Empadas
    Makes 10 empadas
    Total time: 2 hours

    Ingredients: 
    For the dough
    • 1 1/2 cups (225 grams) whole-wheat flour
    • 3/4 cup (105 grams) all-purpose flour
    • 1/2 cup (8 tablespoons) unsalted cold butter, cubed
    • 1 large egg
    • 1/4 cup ice water, plus more as needed

    For the filling:
    • 1/2 pound zucchini (2 medium), cut into 1/2–inch cubes
    • 1 cup corn kernels (from 1 medium ear) or 1 cup frozen kernels, thawed [Oops, we accidentally used canned corn; not the greatest idea since they are already cooked, therefor some of it burned in the oven.]
    • 2 tablespoons extra-virgin olive oil
    • Salt and freshly-ground black pepper
    • 3/4 cup canned black or pinto beans, rinsed and drained 
    • 3/4 cup shredded cheddar cheese
    • 1/2 cup thinly-sliced green onions 
    • 1 teaspoon ground cumin
    • 1/4 teaspoon chile powder
    • Sour cream, for serving, optional
    • Salsa, for serving optional

    For the egg wash:
    • 1 large egg, beaten
    • 1 tablespoon water


    Directions: 
    1. To make the dough, combine both flours in a medium bowl. Using a pastry blender or your fingertips, cut butter into the flour mixture until it’s roughly the size of small peas.
    2. In a separate small bowl, whisk together egg and water. Pour over dry ingredients and mix with a fork until dough begins to come together. If still shaggy, add additional water to help the dough come together, 1 tablespoon at a time. Dump out onto a well-floured surface. Knead dough a few times and carefully gather together into a ball. Wrap in plastic wrap and place in the refrigerator to chill for one hour.
    3. To make the filling, first preheat the oven to 400°F. Line a large rimmed baking sheet with parchment paper.
    4. Spread the diced zucchini and corn on the baking sheet. Drizzle with olive oil and a few grinds of salt and black pepper. Roast for 20 to 25 minutes, or until the zucchini are softened and slightly browned around the edges.
    5. Transfer to a bowl. Fold in the black beans, cheese, green onions, cumin and chili powder.
    6. In a small bowl, prepare the egg wash by mixing together the beaten egg and water.
    7. To assemble the empanadas, divide the dough into 10 equal portions (about 55 grams each). Shape each portion into a ball and roll into a 5- to 6-inch circle about 1/8-inch thick on a cool, lightly-floured surface. Working one at a time, place 1/3 cup filling into the center of the circle. Moisten the edges with the egg wash. Fold one edge over the top of the filling to create a half-moon shape and crimp the edges to seal.
    8. Place the empanada on a parchment-lined baking sheet, brush tops with egg wash, and repeat with remaining dough. Slice a few small slits in the center of each empanada to help release steam while baking.
    9. Bake at 400°F for 22 to 30 minutes or until lightly browned. Serve with sour cream and salsa, if desired.
    NOTE: You can easily freeze these empanadas, either baked or unbaked, to enjoy later on a busy weeknight. To do so, wrap the empanadas well in aluminum foil and label. To bake the empanadas, preheat the oven to 400°F and bake for 30 to 35 minutes or until golden brown and hot all the way through. Cooking time is roughly the same to warm previously-baked empanadas or to fully cook the unbaked empanadas. Do not thaw the empanadas before baking — simply toss them in the oven frozen.

    Thursday, January 15, 2015

    Mile High Perfect Biscuits

    One thing Gary has been wanting to try out is homemade biscuits. But god knows where to find a good recipe when your giraffe-grandma never passed down her family recipe. So we decided to ask around and do a bit of online research and chose a recipe found on Pinterest entitled "Mile High Perfect Biscuits." Gary had been interested in trying a vegan recipe, but since we didn't have most of the ingredients needed, we just went with a regular one, but we will be replacing buttermilk with Almond Milk. Let's see how this goes!

    Gary got to work right away and starting mixing all the dry ingredients together. He then followed the directions and made a "well" and added the wet ingredients. Let's just take a moment here to say we're not 100% sure what the purpose of a well is, but we did it anyway.

    Last ingredient is the butter, cut into cubes. Gary agrees that this was the funnest part! Then came time to smoosh everything down before cutting out the biscuits. It took us a while to find something to cut out the biscuits with because we actually don't own a round cookie cutter, but we found a container cover that was just right. :)

    When we were all done cutting them out and having placed them on a baking sheet, we felt confident that they would turn out quite well. Fingers crossed, we put them in the oven and waited patiently!

    Here is the final result:

    Note: We've already eaten 3 of them, which is why there's empty space on the baking sheet.

    Well, they ended up being a lot bigger than I expected so we had to bake them a good 15 minutes or so longer than the recipe suggested, but they were mouth-watering-ly delicious!! We ate three right away and I'm drooling at the sight of them. Gary would like me to inform you all that they aren't as tasty on the following days, but good nevertheless.


    Thursday, January 1, 2015

    A new year brings new recipes

    Gary and I are excited to announce that now that we're back home and settled in, we're getting back to cooking. This time, we're giving ourselves a 3 month-long challenge of no restaurants, which means we have so many new recipes in store for you all!

    We hope you all had happy holidays and we want to wish everyone a very happy new year! Let 2015 be filled with love, peace and joy; but most importantly, delicious meals. ;)

    Lots of love!
    Gary & Carmen
    xox